

Contents
With the importance of code sharing, Microsoft’s Visual Studio also created its own sharing platform: NuGet. NuGet Package Manager, which is directly integrated into Visual Studio, has offered the code packages of 3rd parties and institutions published on nuget.org to the service of developers. Also completely free.
The platform has become an indispensable part of Visual Studio with the developers’ package sharing. So much so that, instead of adding dlls to your newly created projects, Microsoft has switched to a new structure that provides the package information to be downloaded and allows the dll and files to be downloaded by NuGet Package Manager.
In this post, I will first show you how to install, delete, update and clean cache using NuGet Package Manager. Then I will apply the same operations with commands in Package Manager Console. And finally I will explain you how to upload the .nupkg file in the local directory to the project offline. At the end of this article, you will be able to use NuGet packages in your Visual Studio projects.
So let’s started. Follow the steps below in order.
What is NuGet?
By definition, NuGet is a code sharing mechanism for .NET powered by Microfost. Allows adding, updating and removing libraries to Visual Studio applications.
The NuGet package is a single ZIP file with the extension .nupkg. It contains compiled source code (DLLs) and other related files (scripts, images, package version number). Developers create packages and publish them on a host computer. Package consumers then take these packages from the host computer and add them to their projects. And they call the functionality of a package in their project.
Tell me to explain. You cannot use any third party library directly in your project. First you need to extract the package as a zip file and add the necessary assemblies to the references and files. If updating is required, you have to repeat these processes manually. Fortunately, NuGet does all these things automatically. Using NuGet to install packages reduces the process of configuring these third-party libraries.
I recommend you to review my article where I listed the best NuGet packages. I explained how to use each package with examples.
Installing Packages Using NuGet Package Manager
The NuGet Package Manager in Visual studio enables installing, uninstalling and updating NuGet packages in projects and solutions.
Install a third-party NuGet package
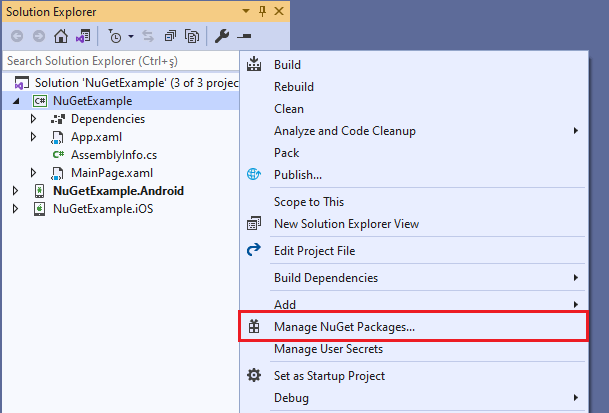
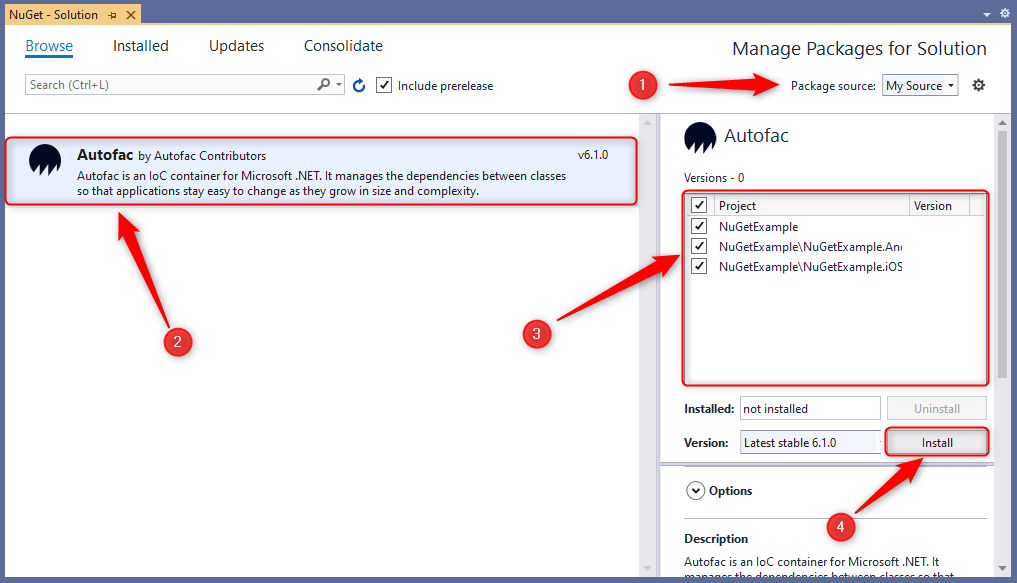
1 In the solution explorer, right-click on Solution, a project, or Reference. Then choose Manage NuGet Packages.
2 In the window that opens, go to the Browse tab. Then type and search for the plugin you want to install in the search bar. Your search results will appear in order according to the number of downloads. Because the Browse tab sorts packages according to their popularity.
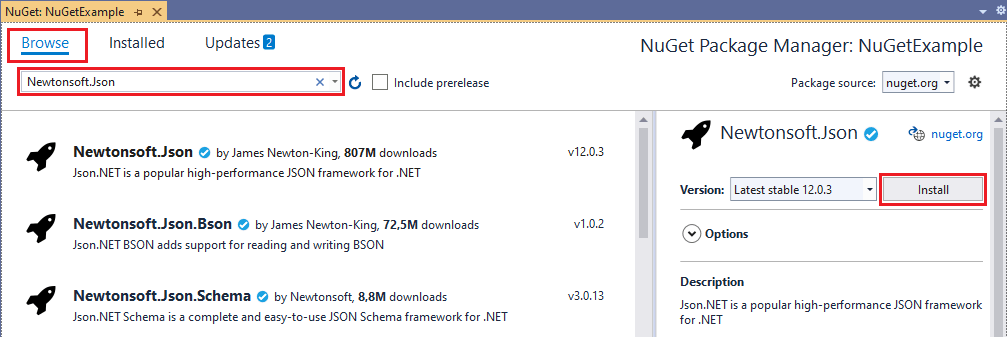
3 Select the version you want to install from the drop-down menu on the right. And then click Install. At this step, if prompted to accept the License terms, accept them. Also, after installing some plugins, a readme.txt file is opened. Within this file you can find the necessary instructions to start the plugin.
Install beta NuGet packages
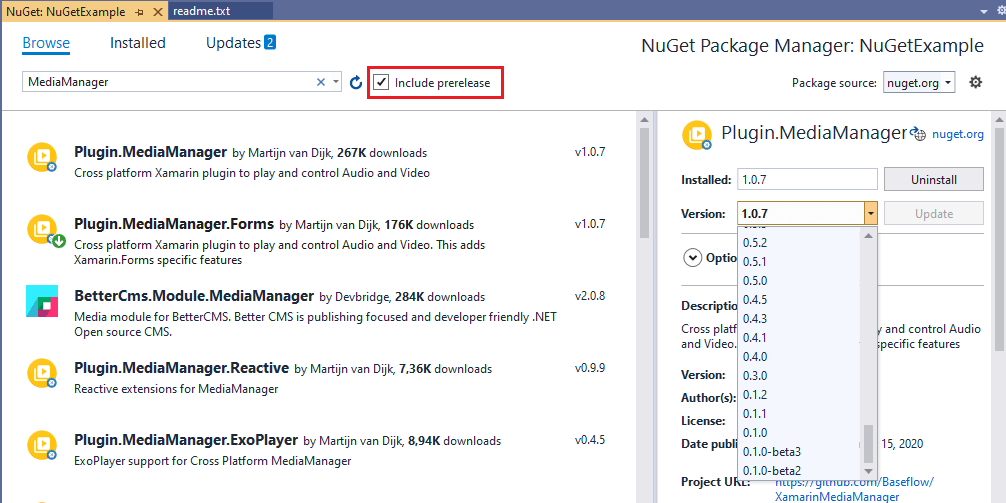
By default, beta versions do not appear in search results. Only stable versions come out. Select Include prerelease next to the search bar to include beta versions in your search.
Uninstall a NuGet package
1 In the solution explorer, right-click on Solution, a project or Reference. Then choose Manage NuGet Packages.
2 Then go to the Insalled tab. Here are the packages installed in your project.
3 Select the package you want to uninstall and click Uninstall. You can find the plugin you want to remove from the search bar.

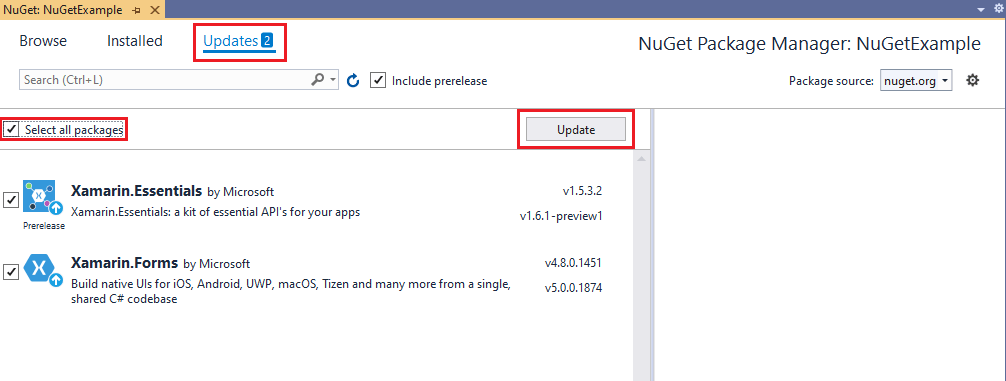
Update NuGet packages
1 In the solution explorer, right-click on Solution, a project or Reference. Then choose Manage NuGet Packages.
2 Then go to the Updates tab. Here are the packages that need to be updated. If you want to update prerelease package versions as well, select the Include pre-release check box.
3 You can update packages either in a single package or in bulk. If you want to update a specific package, select the package and select the desired version from the drop-down menu on the right, then click Update.
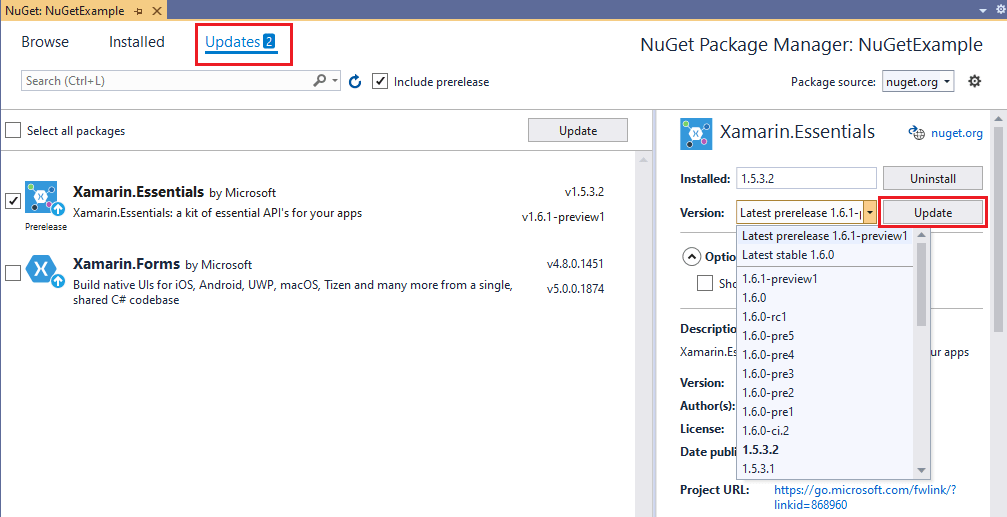
4 If you want to update all packages collectively, select the Select all packages check box. Then click the Update button.
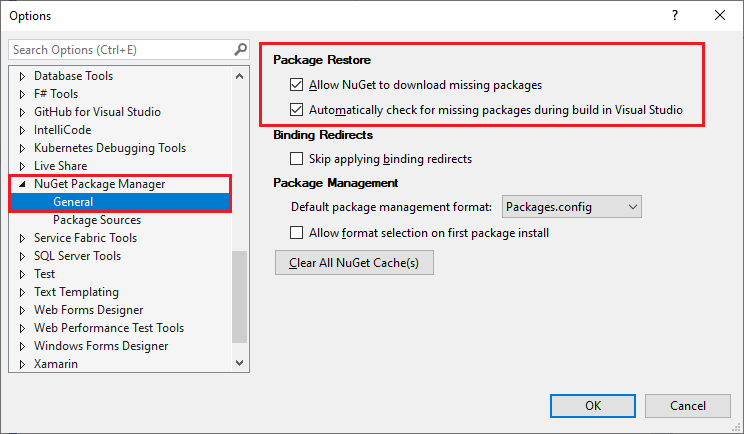
Restore NuGet packages
Package restore installs all of a project’s dependencies as required. All NuGet packages added are restored when the project is opened or compiled.
1 Go to Tools> Options> NuGet Package Manager> General. Then select the Allow NuGet to download missing packages and Automatically check for missing packages during build in Visual Studio checkboxes in Package Restore. These options are already active by default.
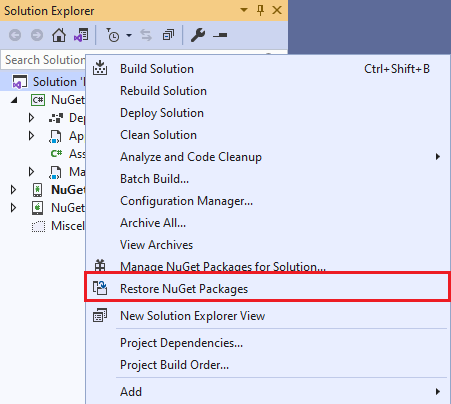
2 Then right click on the project in Solution explorer and select Restore NuGet Packages. Thus, NuGet packages in the project will be repaired.
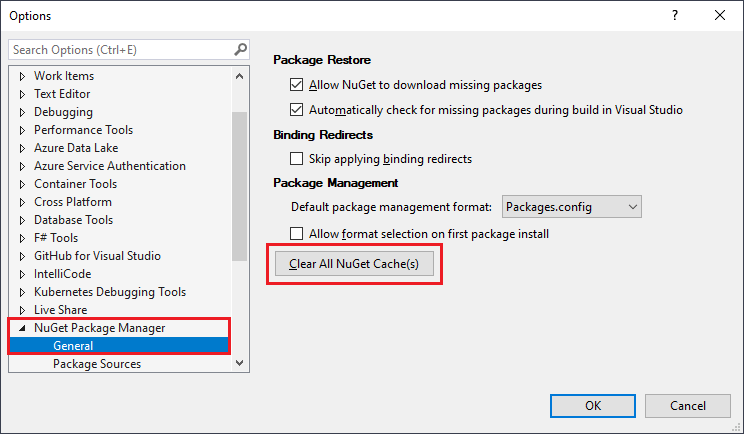
Clear NuGet packages
NuGet packages are loaded from the cache location, if any. Otherwise it will be downloaded from the corresponding stream in the cache location. Sometimes you run into package installation problems or you want to make sure you have installed packages that you installed yourself. In such cases, you should remove the cache. To remove NuGet caches from the cache location, you must clear the NuGet packages.
1 Go to Tools> Options> NuGet Package Manager> General. And then click Clear All NuGet Cache(s).
Package Manager Console
As an alternative to Nuget Package Manager, you can install packages to projects with the Nuget Package Manager Console. NuGet Package Manager Console installs, deletes, repairs and updates packages using NuGet PowerShell commands. NuGet Package Manager Console is built into Visual Studio on Windows.
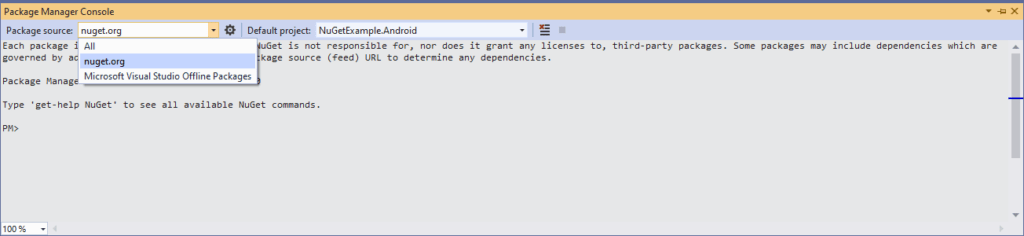
1 To open the NuGet Package Manager Console in Visual Studio, go to Tools> NuGet Package Manager> Package Manager Console.
NOTE: By default, nuget.org is selected as Package source. If you want to install a package from another source, change the package source from the drop-down menu.
Install a NuGet Package
Enter the commands you will type in accordance with the template below into the NuGet Package Manager Console. You can find the commands of the packages you want to install on nuget.org.
Install-Package <Package Name> -Version <version>
Install-Package Newtonsoft.Json -Version 12.0.3Install a beta NuGet package
If you want to install a beta pack, add IncludePrerelease to the command. So you can install beta packages, if available.
Install-Package <Package Name> -Version <version> -IncludePrerelease
Install-Package Newtonsoft.Json -Version 12.0.3 -IncludePrereleaseInstall a NuGet package without dependencies
If you want to install a package without dependencies, add IgnoreDependencies to the command.
Install-Package <Package Name> -Version <version> -IgnoreDependencies
Install-Package Newtonsoft.Json -Version 12.0.3 -IncludePrerelease -IgnoreDependenciesUninstall a NuGet package
To delete a package, enter the commands you will type in the NuGet Package Manager Console in accordance with the template below.
Uninstall-Package <Package Name>
Uninstall-Package Newtonsoft.JsonRemove dependencies when uninstalling a NuGet package
If you want to remove the dependencies of the installed package, add RemoveDependencies to the command.
Uninstall-Package <Package Name> -Version <Version> -RemoveDependencies
Uninstall-Package Newtonsoft.Json -RemoveDependenciesUpdate NuGet packages
To update a package, enter the commands you will type in the NuGet Package Manager Console in accordance with the template below. You can upgrade or downgrade to the version you want.
Update-Package [Package Name] <string> [-Version] <string> [-IgnoreDependencies]
Update-Package Newtonsoft.Json -Version 12.0.3 -IncludePrerelease -IgnoreDependenciesUpdate beta NuGet packages
To update a beta package, enter the commands you will type in the NuGet Package Manager Console in accordance with the template below. You can upgrade or downgrade to the version you want.
Update-Package [Package Name] <string> [-Version] <string> [-IgnoreDependencies] [-IncludePrerelease]
Update-Package Newtonsoft.Json -Version 12.0.3 -IncludePrerelease -IgnoreDependencies -IncludePrereleaseReinstalling NuGet Packages with the Package Manager Console
To reinstall the packages, enter the commands you will type in the NuGet Package Manager Console in accordance with the template below. So you can reinstall all packages with the latest version.
Update-Package -Reinstall
Update-Package -Reinstall
If you want to reinstall all packages with the same version, use:
Update-Package -ProjectName ‘{application name}’ -Reinstall
How to Upload .nupkg File in Local Directory Offline?
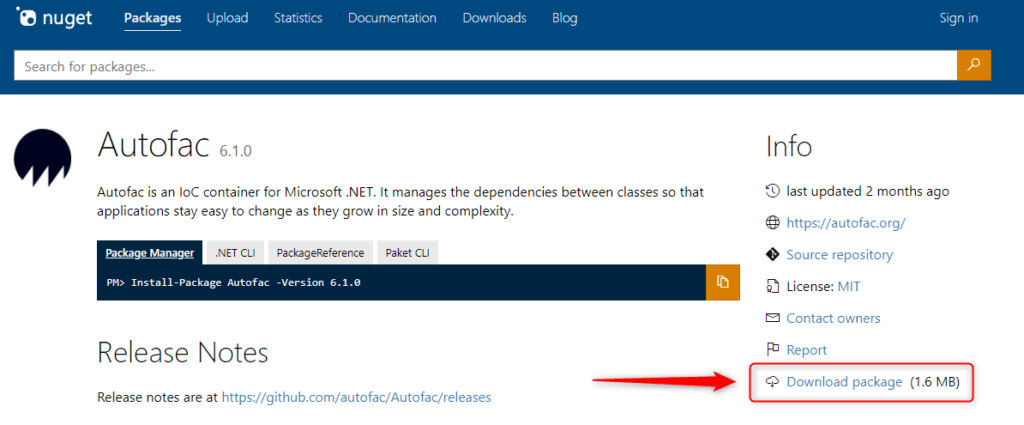
Although it is not preferred very often, it may be necessary to upload a package in .nupkg format to the project. Packages are downloaded to the local directory to be used when there is generally no internet connection. Sometimes, this method is used when it is necessary to use a package that is not included in nuget.org.
As an example, let’s download a package from nuget.org and then install this package in the local folder to the project without using Package Manager or Console. This method also works for packages you download from outside nuget.org. It’s like a package you download from GitHub. Also, no internet connection is required.
1 Search and find the package you want to download from nuget.org. And click on Download Package from the Info section.
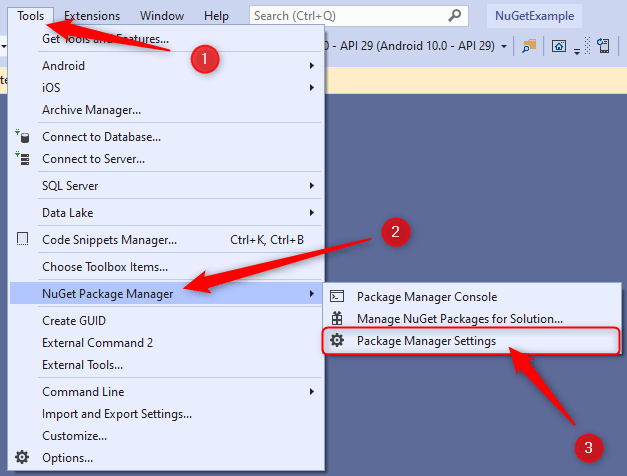
2 Then go to Tools> NuGet Package Manager> Package Manager Settings in Visual Studio.
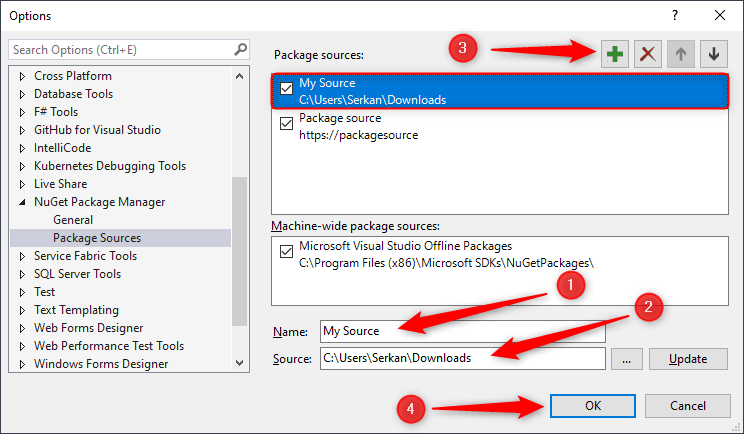
3 In the Options window that opens, you will see the package sources available under Package Sources. Here you have to add a new package source. The name of the new package source is up to you. Select the directory with the .nupkg package you downloaded as source. Then click the plus button and add the new package source.
4 Now go to Nuget Package Manager. To do this, right click on the project and select Manage NuGet Packages. Package source here is nuget.org by default. However, since we want to install from the package source we added, we have to change the package source from the popup window. When you change the package source, only packages with .nupkg extension in the folder we selected will appear. Select the package and platforms you want to install here and click Install.
That’s all
Conlusions
In summary, NuGet packages make the job of software developers much easier. Instead of manually adding third party packages to references and files, it is possible to do all the operations automatically with Nuget.
In this post, I first showed you how to install, delete, update and cache using NuGet Package Manager. Then I applied the same operations with commands in Package Manager Console. And finally I explained you how to upload the .nupkg file in the local directory to the project offline. I hope it was useful.
If you’re still not sure what to do, or if you got any errors, then I suggest you use the comment section below and let me know! I am here to help!
Also, share this blog post on social media and help more people learn.


4 Comments