
İster bir Xamarin projesi ister bir Web projesi olsun, Microsoft teknolojisini kullanan her geliştiricinin NuGet paketlerini kullanmayı öğrenmesi gerekir. Çünkü platformların kendi kontrolleriyle yapılabilecek olan özelleştirmeler kısıtlıdır. Dolayısıyla geliştiriciler çoğu zaman eklenti dediğimiz NuGet paketlerini projelere yüklerler. Böylece iş yükünden ve zamandan tasarruf edilmiş olur.
Kod paylaşımının önem kazanmasıyla Microsoft Visual Studio’da kendi paylaşım platformunu ortaya çıkardı: NuGet. Doğrudan Visual Studio’ya entegre edilen NuGet Package Manager, nuget.org üzerinden yayınlanan üçüncü kişi ve kurumların kod paketlerini geliştiricilerin hizmetine sundu. Hem de tamamen ücretsiz olarak.
Geliştiricilerin paket paylaşımıyla da, platform Visual Studio’nun vazgeçilmez bir parçası haline geldi. Öyle ki, Microsoft bile yeni oluşturulan projelere dll eklemek yerine, indirilecek paket bilgisini verip dll ve dosyaların NuGet Package Manager tarafından indirilmesini sağlayan yeni bir yapıya geçti.
Bu yazıda öncelikle NuGet Paket Yöneticisi’ni kullanarak önbelleğin nasıl kurulacağını, silineceğini, güncelleneceğini ve temizleneceğini göstereceğim. Sonra aynı işlemleri Paket Yöneticisi Konsolundaki komutlarla uygulayacağım. Ve son olarak, yerel dizindeki .nupkg dosyasını projeye çevrimdışı olarak nasıl yükleyeceğinizi açıklayacağım. Bu makalenin sonunda, Visual Studio projelerinizde NuGet paketlerini rahatlıkla kullanabileceksiniz.
NuGet Nedir?
NuGet, Microfost tarafından desteklenen .NET için bir kod paylaşım mekanizmasıdır. Visual Studio uygulamalarına kitaplık eklemeyi, güncellemeyi ve kaldırmayı sağlar.
NuGet paketleri ise .nupkg uzantısına sahip birer ZIP dosyasıdır. Bu paketler derlenmiş kaynak kodu (DLL’ler) ve ilgili diğer dosyaları (scriptler, görüntüler, paket sürüm numarası) içerir. Geliştiriciler paketleri oluşturur ve bunları bir ana bilgisayarda yayınlar. Daha sonra paket tüketicileri bu paketleri ana bilgisayardan alır ve projelerine ekler. Ardından projelerinde bir paketin işlevselliğini çağırırlar.
Herhangi bir üçüncü taraf kitaplığını direkt olarak kullanamazsınız. Önce paketi zip dosyası olarak çıkarıp gerekli derlemeleri referanslara ve dosyalara eklemelesiniz. Eğer güncelleme gerekiyorsa bu işlemleri manuel olarak tekrar yapmalısınız. İşte NuGet tüm bu işlemleri otomatik olarak yapıyor. Paketleri yüklemek için NuGet kullanmak bu üçüncü taraf kitaplıklarını yapılandırma işlemini bir hayli azaltır.
NuGet Paket Yöneticisi İle NuGet Paketlerini Yükleme
Visual Studio’daki The NuGet Package Manager projeler ve çözümlerde NuGet paketlerini yüklemeyi, kaldırmayı ve güncellemeyi sağlar. Şimdi sırayla bu işlemlerin nasıl yapıldığına bakalım.
Üçüncü Taraf Bir NuGet Paketini Yükleme
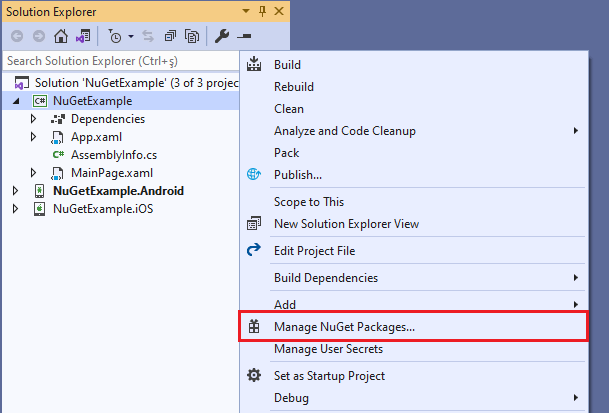
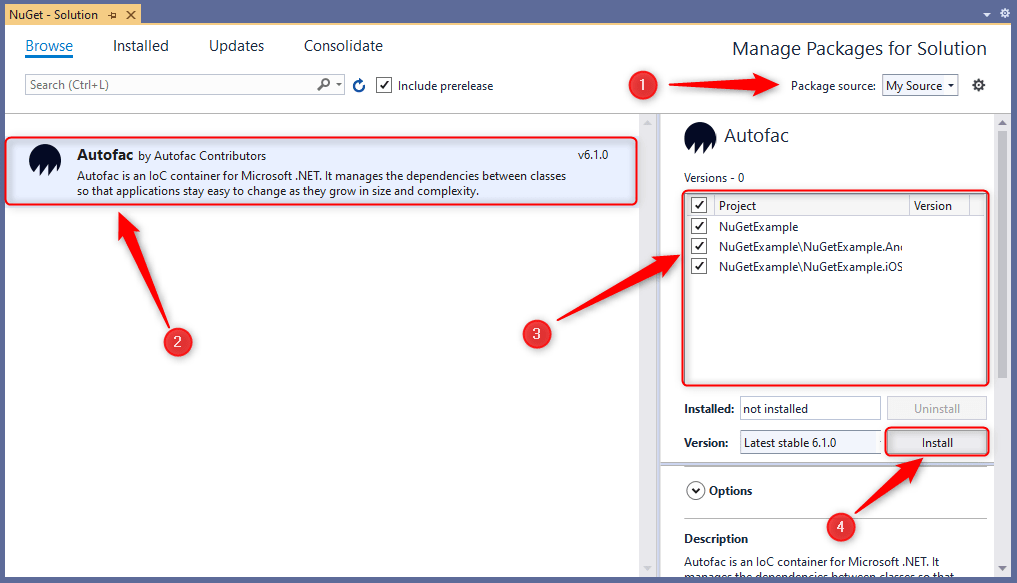
1 Çözüm Gezgininde, çözüme, bir projeye veya Referansa sağ tıklayın. Ardından Manage NuGet Packages’i seçin.
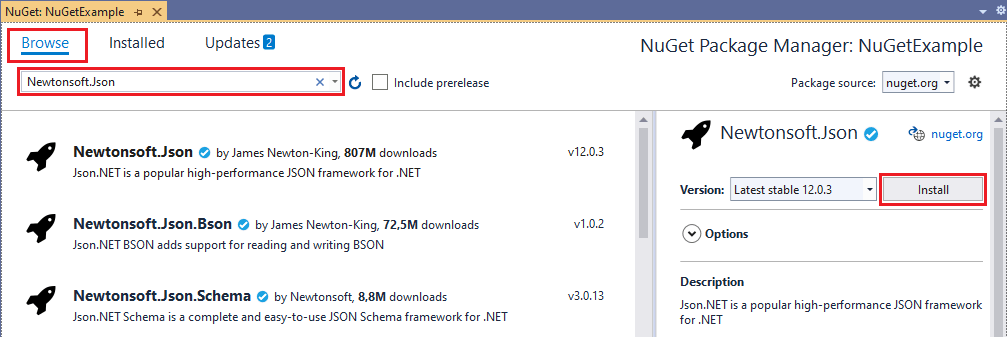
2 Açılan pencerede Browse sekmesine gidin. Ardından arama çubuğuna yüklemek istediğiniz eklentiyi yazıp aratın. Arama sonuçlarınız karşınıza indirme sayısına göre sıralı olarak çıkacaktır. Çünkü Browse sekmesi paketleri popülerliğine göre sıralar.
3 Sağ taraftaki açılır menüden yüklemek istediğiniz sürümü seçin . Ve ardından Install’e tıklayın. Bu adımda karşınıza Lisans koşullarını kabul etmeniz istenirse kabul edin. Ayrıca bazı eklentiler yüklendikten sonra bir readme.txt dosyası açılır. Bu dosya içinde eklentiyi başlatmak için gerekli talimatları bulabilirsiniz.
Beta NuGet Paketlerini Yükleme
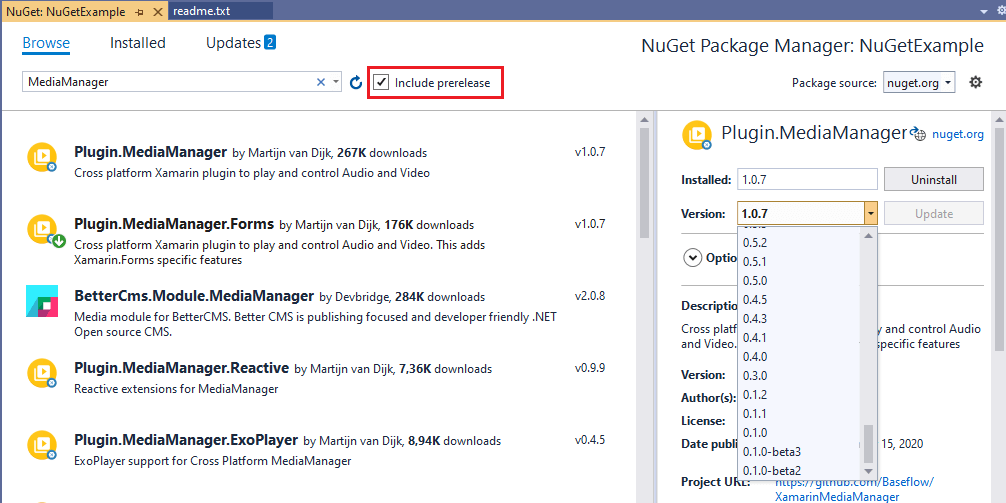
Varsayılan olarak arama sonuçlarında beta sürümler karşınıza çıkmaz. Sadece kararlı sürümler çıkar. Aramanıza beta sürümleri dahil etmek için arama çubuğunun yanındaki Include prerelease seçeneğini seçin.
Bir NuGet Paketini Kaldırma
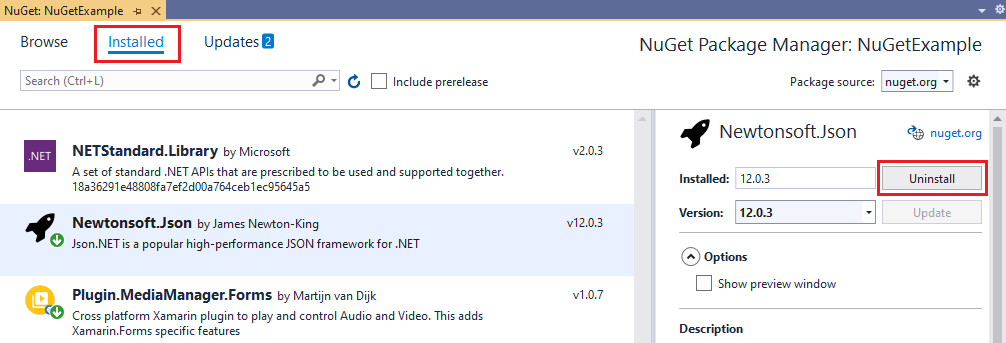
1 Çözüm gezgininde, Çözüme, bir projeye veya Referansa sağ tıklayın. Ardından Manage NuGet Packages’i seçin.
2 Sonra Installed sekmesine gidin. Burada projenizde yüklü olan paketler mevcuttur.
3 Kaldırmak istediğiniz paketi seçin ve Uninstall’a tıklayın. Dilerseniz kaldırmak istediğiniz eklentiyi arama çubuğundan bulabilirsiniz.
NuGet Paketlerini Güncelleme
1 Çözüm gezgininde, Çözüme, bir projeye veya Referansa sağ tıklayın.
2 Ardından Manage NuGet Packages’i seçin.
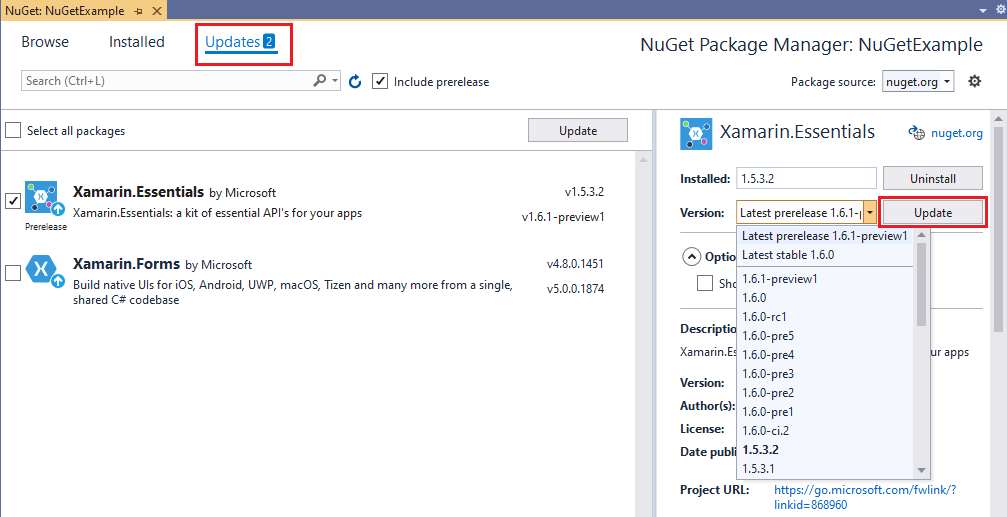
Daha sonra Updates sekmesine gidin. Burada güncellenmesi gereken paketler yer alır. Eğer ön sürüm paket sürümlerini de güncellemek istiyorsanız Ön sürüm dahil et onay kutusunu seçin.
3 İster tek bir paketi, isterseniz de toplu olarak paketleri güncelleyebilirsiniz. Eğer belirli bir paketi güncellemek istiyorsanız, paketi seçin ve sağdaki açılır menüden istediğiniz versiyonu seçin, ardından Update’ye tıklayın.
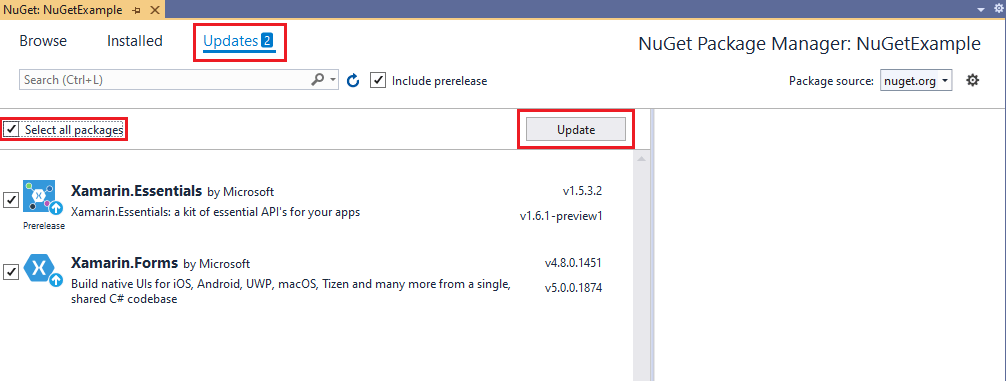
4 Eğer tüm paketleri topluca güncellemek istiyorsanız Select all packages onay kutusunu seçin. Ardınan Update butonuna tıklayın.
NuGet Paketlerini Geri Yükleme (Onarma)
Paket geri yükleme bir projenin tüm bağımlılıklarını gerektiği gibi yükler. Proje açıldığında veya derlendiğinde, eklenen tüm NuGet paketleri geri yüklenir.
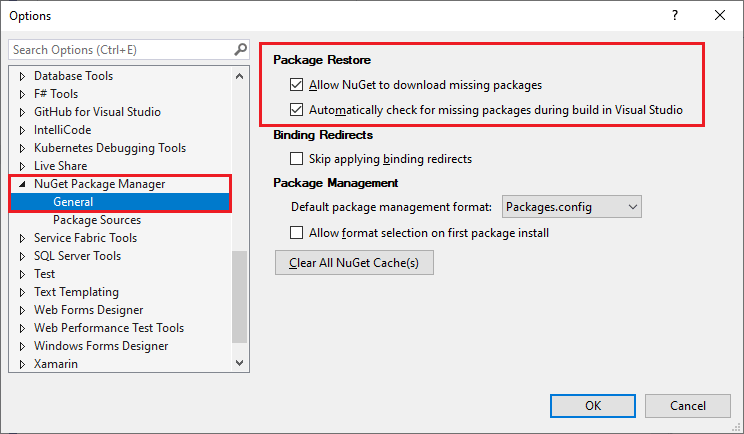
1 Tools > Options > NuGet Package Manager > General ‘e gidin. Ardından Package Restore’daki Allow NuGet to download missing packages ve Automatically check for missing packages during build in Visual Studio onay kutularını seçin. Zaten varsayılan olarak bu seçenekler aktiftir.
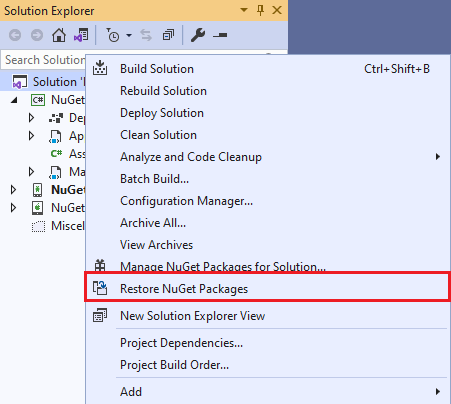
2 Daha sonra Çözüm gezgininde projeye sağ tıklayın ve Restore NuGet Packages’i seçin. Böylece projedeki NuGet paketleri onarılacak.
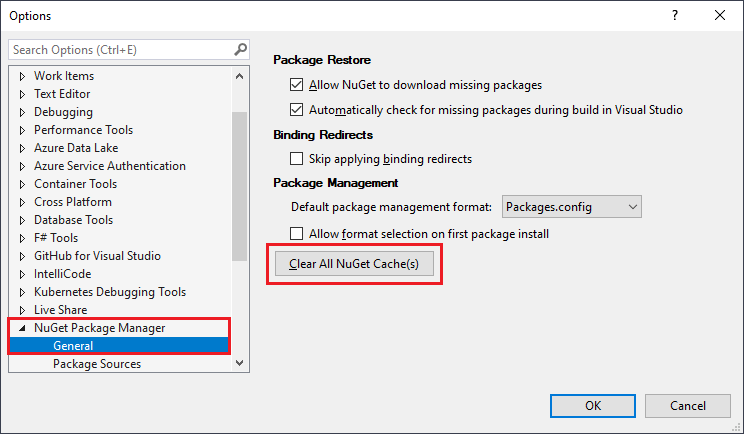
NuGet Paketlerini Temizleme (Önbellek)
NuGet paketleri varsa önbellek konumundan yüklenir. Yoksa önbellek konumundaki karşılık gelen akıştan indirilir. Bazen paket yükleme sorunlarıyla karşılaşırsınız ya da kendi yüklediğiniz paketleri yüklediğinizden emin olmak istersiniz. Böyle durumlarda önbelleği kaldırmalısınız. NuGet önbelleklerini önbellek konumundan kaldırmak için NuGet paketlerini temizlemelisiniz.
1 Tools > Options > NuGet Package Manager > General ‘e gidin. Ve Clear All NuGet Cache(s)‘a tıklayın.
Paket Yöneticisi Konsolu ile NuGet Paketlerini Yükleme
Nuget Package Manager’a alternatif olarak Nuget Package Manager Console ile de paketleri projelere yükleyebilirsiniz. NuGet Package Manager Console NuGet PowerShell komutlarını kullanarak paketleri yükler, siler, onarır ve günceller. NuGet Package Manager Console Windows’da Visual Studio’ya yerleşik olarak yer alır.
1 Visual Studio’da NuGet Package Manager Console açmak için Tools > NuGet Package Manager > Package Manager Console’a gidin.
NOT: Varsayılan Paket kaynağı olarak nuget.org seçilidir. Eğer başka bir kaynaktan paket yüklemek istiyorsanız açılır menüden paket kaynağını değiştirin.

Paket Yöneticisi Konsolu ile NuGet Paketlerini Yükleme
Aşağıdaki şablona uygun olarak yazacağınız komutları NuGet Package Manager Console’a girin. Yüklemek istediğiniz paketlerin komutlarını nuget.org’dan bulabilirsiniz.
Install-Package <Package Name> -Version <version>
Install-Package Newtonsoft.Json -Version 12.0.3Paket Yöneticisi Konsolu ile Beta NuGet Paketlerini Yükleme
Bir beta paketi yüklemek istiyorsanız komuta IncludePrerelease ekleyin. Böylece varsa beta paketleri de yükleyebilirsiniz.
Install-Package <Package Name> -Version <version> -IncludePrerelease
Install-Package Newtonsoft.Json -Version 12.0.3 -IncludePrereleasePaket Yöneticisi Konsolu ile Bağımlılıkları Olmayan NuGet Paketlerini Yükleme
Bağımlılıklar olmadan bir paket yüklemek istiyorsanız komuta IgnoreDependencies ekleyin.
Install-Package <Package Name> -Version <version> -IgnoreDependencies
Install-Package Newtonsoft.Json -Version 12.0.3 -IncludePrerelease -IgnoreDependenciesPaket Yöneticisi Konsolu ile NuGet Paketlerini Kaldırma
Bir paketi silmek için aşağıdaki şablona uygun olarak yazacağınız komutları NuGet Package Manager Console’a girin.
Uninstall-Package <Package Name>
Uninstall-Package Newtonsoft.JsonPaket Yöneticisi Konsolu ile Bir NuGet Paketini Kaldırırken Bağımlılıkları da Kaldırma
Yüklü paketin bağımlılıklarını kaldırmak istiyorsanız komuta RemoveDependencies ekleyin.
Uninstall-Package <Package Name> -Version <Version> -RemoveDependencies
Uninstall-Package Newtonsoft.Json -RemoveDependenciesPaket Yöneticisi Konsolu ile NuGet Paketlerini Güncelleme
Bir paketi güncellemek için aşağıdaki şablona uygun olarak yazacağınız komutları NuGet Package Manager Console’a girin. İstediğiniz versiyona yükseltebilir veya düşürebilirsiniz.
Update-Package [Package Name] <string> [-Version] <string> [-IgnoreDependencies]
Update-Package Newtonsoft.Json -Version 12.0.3 -IncludePrerelease -IgnoreDependenciesPaket Yöneticisi Konsolu ile Beta NuGet Paketlerini Güncelleme
Bir beta paketi güncellemek için aşağıdaki şablona uygun olarak yazacağınız komutları NuGet Package Manager Console’a girin. İstediğiniz versiyona yükseltebilir veya düşürebilirsiniz.
Update-Package [Package Name] <string> [-Version] <string> [-IgnoreDependencies] [-IncludePrerelease]
Update-Package Newtonsoft.Json -Version 12.0.3 -IncludePrerelease -IgnoreDependencies -IncludePrereleasePaket Yöneticisi Konsolu ile NuGet Paketlerini Yeniden Yükleme
Paketleri yeniden yüklemek için aşağıdaki şablona uygun olarak yazacağınız komutları NuGet Package Manager Console’a girin. Böylece en son sürümüyle tüm paketleri yeniden yükleyebilirsiniz.
Update-Package -Reinstall
Update-Package -ReinstallEğer tüm paketleri aynı sürümle yeniden yüklemek istiyorsanız şunu kullanın:
Update-Package -ProjectName ‘{application name}’ -ReinstallYerel Dizindeki .nupkg Dosyası Çevrimdışı Olarak Nasıl Yüklenir?
Yerel dizindeki NuGet paketlerini projeye yüklemek mümkündür.
Çok sık tercih edilmese de .nupkg formatındaki bir paketi projeye yüklemek gerekebilir. Genelde internet bağlantısının olmayacağı zamanlarda kullanılmak üzere paketler yerel dizine indirilir. Bazen de nuget.org’da yer almayan bir paketi kullanmak gerektiğinde bu yönteme başvurulur.
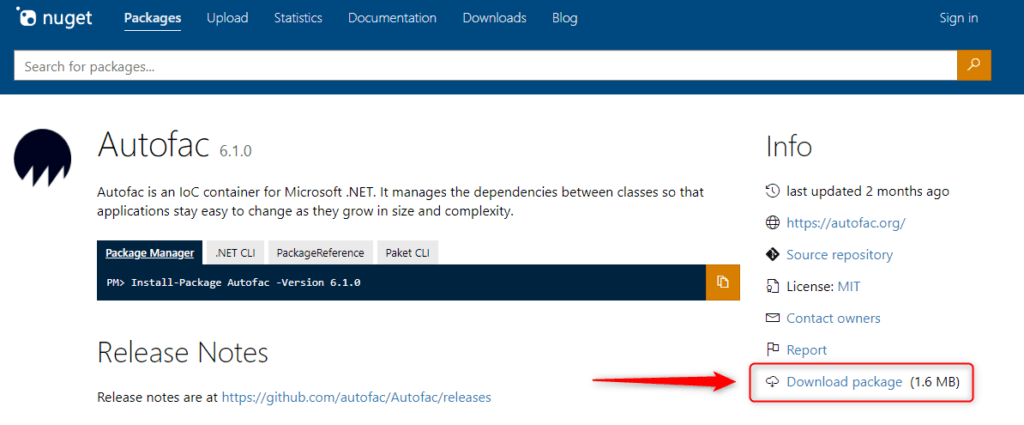
Örnek olarak nuget.org’dan bir paket indirelim ve ardından yerel klasördeki bu paketi Paket Yöneticisi ya da Konsol kullanmadan projeye yükleyelim. Bu yöntem nuget.org dışından indirdiğiniz paketler için de geçerlidir. GitHub’dan indirdiğiniz bir paket gibi. Ayrıca internet bağlantısına da gerek yoktur.
1 nuget.org’dan yüklemek istedeğiniz paketi aratıp bulun. Ve Info kısmından Download Package‘ye tıklayın.
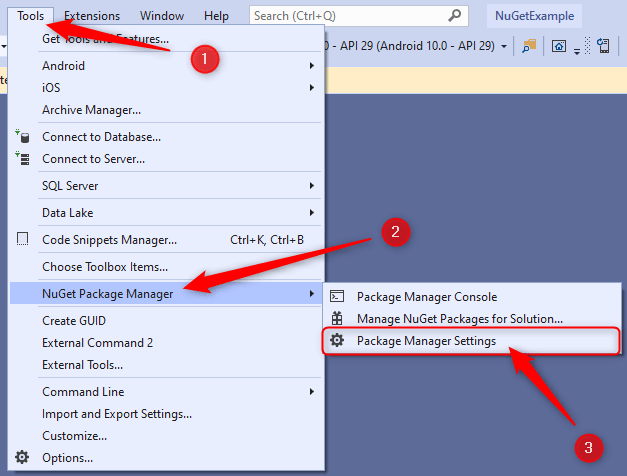
2 Daha sonra Visual Studio’da Tools>NuGet Package Manager>Package Manager Settings‘e gidin.
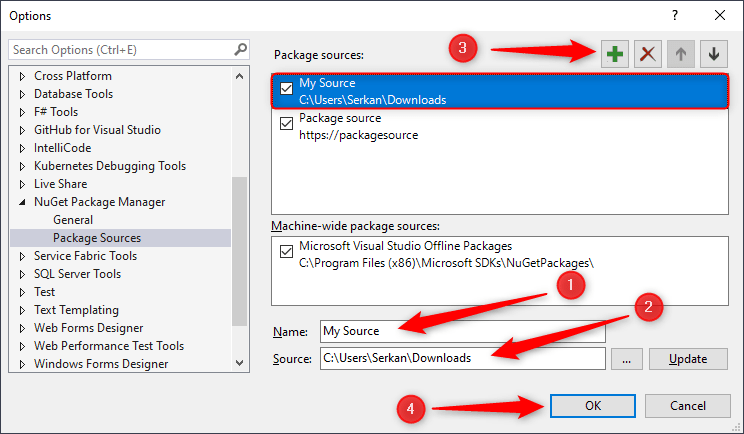
3 Açılan Options penceresinde Package Sources altında var olan paket kaynaklarını göreceksiniz. Burada yeni bir paket kaynağı eklemelisiniz. Yeni paket kaynağının adı size kalmış. Kaynak olarak indirdiğiniz .nupkg uzantılı paketin olduğu dizini seçin. Ardından artı butonuna tıklayın ve yeni paket kaynağını ekleyin.
3 Şimdi Nuget Package Manager’a gidin. Bunun için projeye sağ tıklayın ve Manage NuGet Packages‘i seçin. Burada Paket kaynağı varsayılan olarak nuget.org’dur. Ancak biz kendi eklediğimiz paket kaynağından yükleme yapmak istediğimiz için açılır pencereden paket kaynağını değiştirmeliyiz. Paket kaynağını değiştirince sadece seçtiğimiz klasörde yer alan .nupkg uzantılı paketler görünecek. Burada yüklemek istediğiniz paketi ve platformları seçin ve Install’a tıklayın.
Bu kadar.
Sonuç
Özet olarak, NuGet paketleri yazılım geliştiricilerin işini bir hayli kolaylaştırıyor. Third party paketlerini referanslara ve dosyalara manuel olarak eklemek yerine Nuget ile tüm işlemleri otomatik olarak yaparak zaman kazanabilirsiniz.
Bu yazıda önce NuGet Paket Yöneticisi kullanarak nasıl kurulacağını, silineceğini, güncelleneceğini ve önbelleğe alınacağını gösterdim. Daha sonra aynı işlemleri Paket Yöneticisi Konsolundaki komutlarla uyguladım. Son olarak, yerel dizindeki .nupkg dosyasını projeye çevrimdışı olarak nasıl yükleyeceğinizi açıkladım. Umarım yararlı olmuştur.