
Mobil uygulamaların başlaması biraz zaman alır. Özellikle bir uygulama cihazda ilk kez çalıştığında kullanıcı ana sayfa açılmadan önce bir süre bekler. Siz de geliştirdiğiniz uygulamalarda ana sayfa açılıncaya kadar geçen sürede kullanıcıya giriş ekranı(splash screen) gösterek bu süreyi değerlendirebilirsiniz. Böylece kullanıcı deneyimini artırabilir ve marka bilgilerini gösterebilirsiniz.
Bu yazıda hem Xamarin.Forms’da hem de Xamarin.Android’de geçerli olacak şekilde yatay ve dikey modda splash ekranı yapımını anlatacağım.
Giriş Ekranı (Splash Screen) Nedir?
Giriş ekranı yani diğer adıyla splash screen, bir mobil uygulamanın çalıştığı andan ana sayfa yükleninceye kadar geçen sürede kullanıcının gördüğü ekrandır. Yani bir kullanıcının uygulamayla ilgili ilk deneyimidir.
Mobil uygulamalarda ana sayfa yükleninceye kadar geçen sürede boş bir ekran gösterilmemelidir. Çünkü boş bir ekran göstermek kullanıcıya uygulamanın geç açıldığı hissini verir. Dolayısıyla kullanıcı deneyimini olumsuz etkiler.
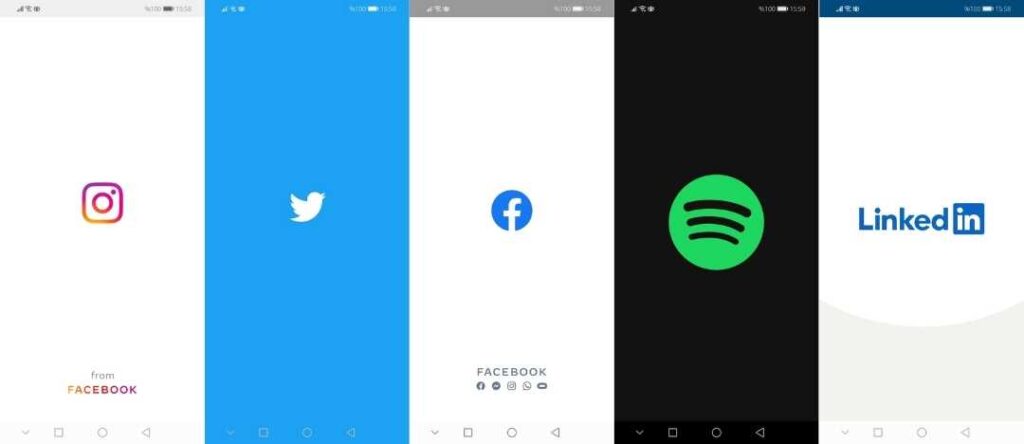
Aslında hemen hemen bütün sosyal medya uygulamalarında giriş ekranlarını görmek mümkün. Facebook, Twitter, Instagram, Linkedin gibi çok sık kullandığımız uygulamalar başlarken ana sayfadan önce giriş ekranları görürüz. Fark ettiyseniz, bu giriş ekranları bu uygulamaların kendi markalarını yansıtacak şekilde tasarlanmıştır.
Doğru Giriş Ekranı Nasıl Yapılır?
Size kendi geliştirdiğim uygulamalarda nasıl splash ekranı yaptığımı göstereceğim. Aşağıdaki adımları sırasıyla uygulayın.
Giriş ekranı için arka plan rengi belirleyin
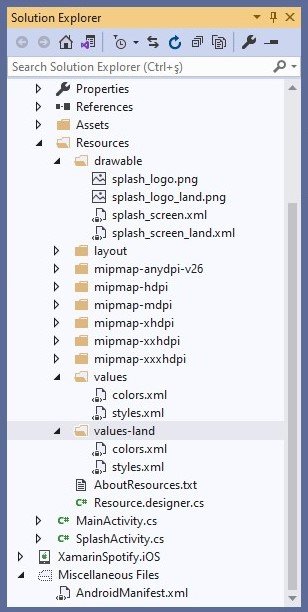
1 İlk önce projenizdeki Resources/values/colors.xml dosyasına gidin. Daha sonra burada <color> etiketleri arasında bir renk tanımlayın. Bu sizin giriş ekranınızın arka plan rengi olacak.
colors.xml dosyası içerisinde uygulamada kullanılacak olan tanımlanmış renkler yer alır. Bu konuyu Malzeme Temasında anlatmıştım.
Ben arka plan rengi için #eff1f7 kodlu renk tonunu tanımladım.
<resources>
  <color name="splash_background">#eff1f7</color>
</resources>
Logunuzu belirleyin
2 Ardından giriş ekranında göstermek istediğiniz logoyu seçin ve Resources/drawable klasörüne atın. Mümkünse logonuzun arka plan rengini şeffaf yapın. Böylece daha iyi bir görünüş elde edersiniz.

Giriş ekranı için bir Drawable oluşturun
3 Daha sonra Resources/drawable içerisine giriş ekranında göstermek için bir XML drawable dosyası ekleyin. Ve arka plan rengi ve logoyu aşağıdaki gibi ayarlayın.
<?xml version="1.0" encoding="utf-8"?>
<layer-list xmlns:android="http://schemas.android.com/apk/res/android">
  <item>
    <color android:color="@color/splash_background"/>
  </item>
  <item>
    <bitmap
        android:src="@drawable/splash_logo"
        android:tileMode="disabled"
        android:gravity="center"/>
  </item>
</layer-list>
Giriş ekranına özel tema oluşturun
4 Şimdi de Resources/values /styles.xml yoluna gidin ve burada giriş ekranına özel bir tema oluşturun. Bu temayı oluştururken statusBarColor, navigationBarColor gibi alanların renginin markanıza uygun renk tonları ile uyumlu olmasına dikkat edin. Yani arka plan rengi ile bildirim çubuğu ve alt gezinti menüsünün renkleri bir bütünlük sağlayın.
styles.xml dosyası içerisinde uygulamada kullanılacak olan varsayılan ve özel temalar yer alır. Bu konuyu Malzeme Temasında anlatmıştım.
<style name="SplashTheme" parent ="Theme.AppCompat.Light.NoActionBar">
    <item name="android:windowBackground">@drawable/splash_screen</item>
    <item name="android:windowNoTitle">true</item>
    <item name="android:windowFullscreen">true</item>
    <item name="android:windowContentOverlay">@null</item>
    <item name="android:windowActionBar">true</item>
    <item name="android:statusBarColor">@color/splash_background</item>
    <item name="android:navigationBarColor">@color/splash_background</item>
</style>
Splash Acitivty oluşturun
5 Son olarak uygulamanızın Android klasörüne SplashActivity adında yeni bir Activity ekleyin. Bu aktivite giriş ekranının aktivitesi olacak. Yani uygulama çalışmaya başladığında ana sayfa yükleninceye kadar bu aktivite görünecek.
Ardından SplashAcitivity’nin onCreate() yönteminde MainActivity etkinliğini başlatın. Böylece uygulamanın giriş ekranından sonra MainActivity’e gitmesini sağlayın.
SplashActivity’nin [Activity] özniteliğindeki bazı özellikleri aşağıdaki gibi değiştirin:
- MainLauncher özelliğini true olarak ayarlayın . Bu sayede, uygulama ilk kez çalıştığında, kullanıcı MainActivity açılana kadar giriş ekranı aktivitesini görür. Ve tabiki daha sonra MainActivity‘nin MainLauncher özelliğini false olarak ayarlamalısınız.
- Theme özelliğini, styles.xml’de oluşturduğunuz özel tema ile değiştirin.
- NoHistory özelliğini true yapın . Burası çok önemli. Çünkü kullanıcı MainActivity’deyken geri düğmesine basarsa, giriş ekranına döner. Bu, kullanıcı deneyimini olumsuz etkiler. NoHistory özelliğini true yaparak bunu önleyebilirsiniz .
[Activity(Label = "Weather", Theme = "@style/SplashTheme", Icon = "@drawable/app_icon", MainLauncher = true, NoHistory = true)]
public class SplashActivity : Activity
{
    protected override void OnCreate(Bundle savedInstanceState)
    {
        base.OnCreate(savedInstanceState);
        this.StartActivity(typeof(MainActivity));
    }
}
Adımları tamamladıktan sonra uygulamayı çalıştırın ve nasıl göründüğüne bakın.
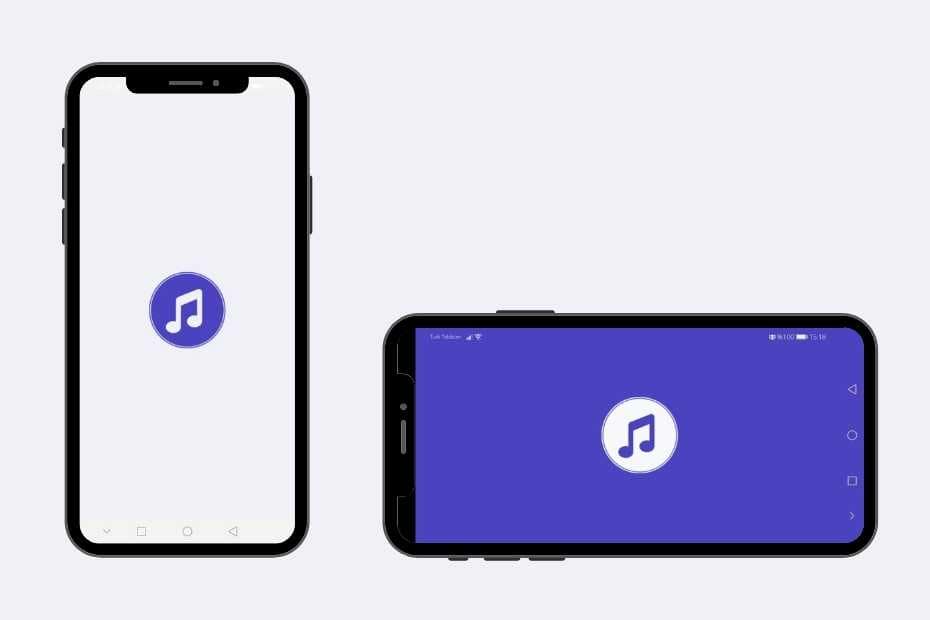
Manzara Modunda(Yatay Mod) Giriş Ekranı
Yukarıdaki adımları takip ederseniz, hem yatay hem de dikey olarak sorunsuz çalışacaktır. Ancak bazı durumlarda, yatay ekranda farklı bir giriş ekranı göstermeniz gerekebilir.
Yatay olarak bir giriş ekranı eklemek için aşağıdaki adımları sırasıyla izleyin.
Yatay mod için logonuzu belirleyin
1 İlk olarak yatay modda görünecek logoyu Resources/drawable klasörüne atın. Karışıklığı önlemek için dikey olarak görünecek logo ile farklı isimler verin.
Yatay mod için values-land klasörü oluşturun
2 Sonra, Resources klasöründe values-land adında bir klasör oluşturun. Manzara modunda ait olan colors.xml ve styles.xml dosyaları bu klasörde olacak.
3 Resources/values içindeki colors.xml ve styles.xml dosyalarını kopyalayıp values-land klasörü içine yapıştırın.
Yatay moddaki giriş ekranı için arka plan rengini belirleyin
4 Ardından, values-land klasöründeki colors.xml dosyasını açın . Burada yatay modda görünecek arka plan rengini tanımlayın.
<color name="splash_background_land">#4a42bf</color>Yatay moddaki giriş ekranı için bir Drawable oluşturun
5 Resources/drawable klasöründe yeniden bir XML drawable dosyası oluşturun. Karışıklığı önlemek için yatay modda görünecek olan XML dosyasına farklı bir ad verin.
<?xml version="1.0" encoding="utf-8" ?>
<layer-list xmlns:android="http://schemas.android.com/apk/res/android">
  <item
      android:drawable="@color/splash_background_land" />
  <item>
    <bitmap
        android:gravity="center"
        android:src="@drawable/splash_logo_land"
        android:tileMode="disabled" />
  </item>
</layer-list>
Manzara moduna özel tema belirleyin
6 Son olarak, values-land klasörünü tekrar açın. Burada styles.xml dosyasında yatay modda görünecek temanın windowBackground, statusBarColor ve navigationBarColor gibi alanların rengini değiştirin.
<style name="SplashTheme" parent ="Theme.AppCompat.Light.NoActionBar">
    <item name="android:windowBackground">@drawable/splash_screen_land</item>
    <item name="android:windowNoTitle">true</item>
    <item name="android:statusBarColor">@color/purple</item>
    <item name="android:navigationBarColor">@color/purple</item>
</style>
Tüm adımları uyguladıktan sonra uygulamayı çalıştırın. Uygulama başlangıçta dikey modda çalışırken, dikey modun giriş ekranı görünür. Bu esnada ekranı döndürürseniz cihazınız yatay moda geçecek ve manzara modunun giriş ekranı görünmeye başlayacaktır.
Sonuç
Başlangıç ekranları (splash screen) mobil uygulamaların çalışmaya başladığı andan ana sayfa yükleninceye kadar geçen sürede kullanıcıya gösterilen ekrandır. Genelde marka bilgilerini göstermek için kullanılır.
Başlangıç ekranları mobil uygulamaların kullanıcı deneyimi açısından oldukça önemlidir. Eğer bir kullanıcı uygulamanın ana sayfası yükleninceye kadar geçen sürede hiçbir şey görmezse kalitesiz bir deneyim yaşadığını hisseder.
Bu yazıda Xamarin uygulamalarınız için yatay ve dikey modda giriş ekranı yapımını anlattım. Ben de Xamarin platformunda geliştirdiğim uygulamalarda bu yoldan yapmayı tercih ediyorum.